1
home books fashion diy life beauty
Showing posts with label DIY. Show all posts

Sunday, August 11, 2013

DIY glitter & studs candle votives! (And how to get the glitter to stay in place!)

1

I'm getting ready to head back to college soon and I wanted some pretty things to put on my window sill-I saw a couple of ideas for candle holders on Pinterest and I thought they would be perfect!

I bought little battery operated tea lights from Walmart for $2.50 for a pack of 6, and they fit perfectly in the votives I found in the candle section for $0.74 each!

HINTS & TIPS
-Wash each votive out before you do anything with it. You want to get the Walmart germs out.
-I used tacky glue, but mod podge is probably the better choice.
-Wait overnight for the glue to dry. Trust me.
-If you don't plan to light anything on fire with these, spray them with a bit of hairspray to keep the glitter in place.

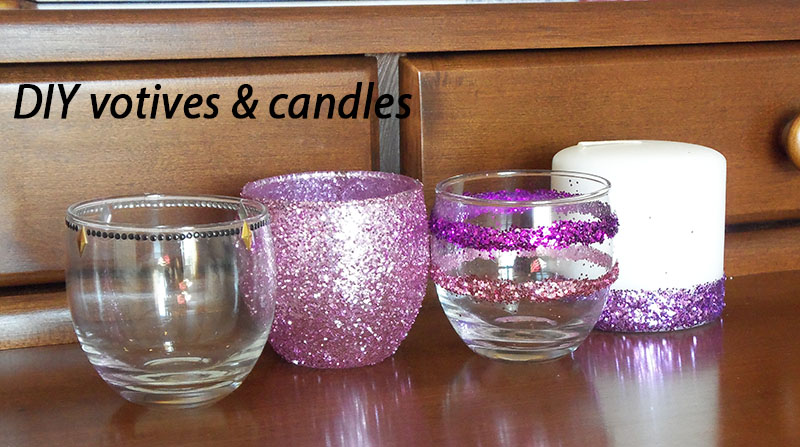
"Moroccan-inspired" votive and full glitter votive

2

"Moroccan Inspired"
This is my favorite of the bunch! I wanted to do something different so I whipped out a nail art kit I had from Forever21 that was all studs to put on it. Here's how to make it:

-You'll need lots of small round studs and four accent ones.
-Paint a small strip of clear nail polish where you want to place the small studs and quickly place them down. It's time consuming, but doing it this way ensures the studs will actually stick.
-Mark out four areas on the glass to put the accent studs. You can do more, but four is a good number.
-Continue working in small increments around the glass. I was able to use a regular dotting tool, and I first dipped it slightly into the clear polish to make it sticky, and then I picked up the stud and placed it on the glass.

"Full glitter"
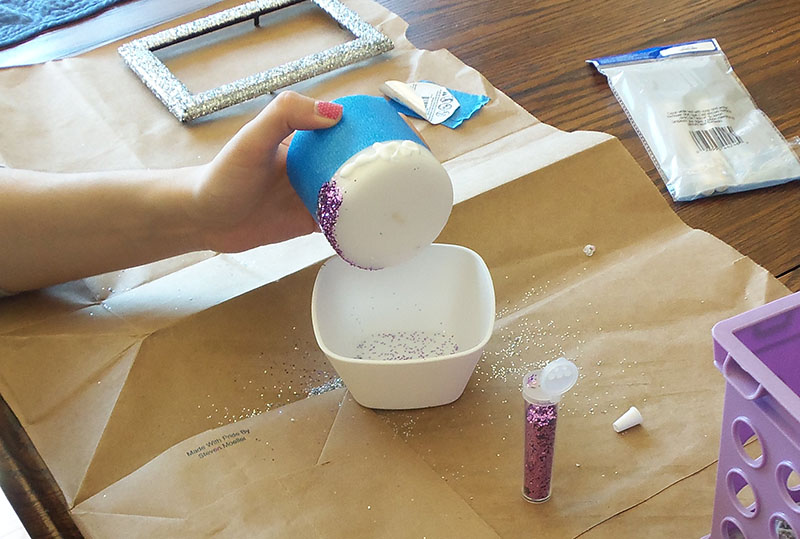
Be warned-this makes a mess!

-Work in sections-paint a stripe of glue with a foam brush and then quickly coat it in the glitter. Try to get an even application with the glitter so there's no spots.
-When you're finished and the glue has dried overnight, go outside and spray the whole votive with hairspray. DO NOT DO THIS IF YOU PLAN TO PUT A REAL FIRE TEALIGHT IN IT. Hairspray is flammable and could catch on fire if you actually light a tea light inside. Spraying it with hairspray ensures the glitter will stay in place and not drop all over your carpet, but only do it if you plan to use battery candles inside.


"Striped" votive & candle

3

To make the striped votive you can do one of two methods:
Use double sided tape to create crisp lines and then pour the glitter on
...or if you're lazy/cheap like me, use the same tacky glue to create a semi-straight line, call it good, and pour the glitter one one row at a time. Click here to see the other version of this project & how it's done.

The candle is also really easy. I don't plan to light it so I grabbed a cheap $1 column candle from Walmart. All you have to do is put masking tape wherever you want the stripe to start on the candle, cover it with tacky glue from there on down, and cover with glitter.
When you remove the tape when it dries, do it slowly because the glitter might want to remove with it!


5

I'd love to know what you think of today's DIY! Don't forget to pin if you like or share on Twitter or Facebook!


Simply Swider

Sunday, August 4, 2013

DIY easy, classic bow makeup brush holders!

1

I was previously using mesh pencil holders to keep my makeup brushes in, and I decided that I wanted something that would fit the vintage, classic decor of my dresser more. I was inspired by a myriad of projects on Pinterest and actually planned to use glitter on these, but I love how they look with just the bows so I keep it simple!


2

Here's what you'll need
Small glass cups. I bought mine from the dollar store in the candle section. I also hand washed these prior to the project.
Tacky Glue. Hot glue might be better, but you have to be much more careful with it because the ribbon is thin.
Medium sized ribbon. I chose grosgrain ribbon because I thought it looked the nicest.
Glitter, it's optional if you want to cover the inside of the glass with it like this project here.


3

The bows are pretty easy to create, but they're just time consuming. Start with two bands that will snugly fit where you want them to on your cups. Glue the ends, and leave them to dry completely.


4

After that you'll need two more pieces to finish the bows: the actual bow part, which is a long strip with the ends folded into the center and glued; and a small strip to wrap around the center.

Once you've glued everything, slide a paperclip over top to help keep everything together and let it dry.

After that, you just need to slide it over the cup, and if it's sliding a bit, add a small dot of glue between the bow and the glass to keep it in place!


1

And voila! Two beautiful makeup brush holders that look timeless sitting on any vanity!

Don't forget to pin & share, and let me know what you think in the comments!

Tuesday, July 23, 2013

DIY Mondrian inspired dry erase board-from Modcloth!


Final1


So I was cruising Modcloth's apartment section (we all know how many cute things they have!) and I stumbled on this message board that as a graphic design major, thrilled me to no end! However, it's $14.99 (insert sad broke college student face). Amazon also has one for $10, , but I decided to go even cheaper & make my own!

Here's what you'll need:
Small dry erase board-$1 (I bought mine at the dollar general)
Sharpies in blue, red, and yellow-$0 (If you don't have them lying around, they're less than a dollar each)
Ruler-$0 (still have mine from my elementary days!)

Total time: <30 mins


Final2


1. Gather your materials. It's a lot less time to do the project if you hunt down the Sharpies before!

2. Using your ruler, create guidelines for the solid black lines. It doesn't have to be perfect, and I used the Modcloth one as a guide. Best part is, if you make a mistake draw over it with the dry erase marker and it will erase!

3. Once you have all the lines, color in the solid blocks of color. I recommend doing this first because the colored Sharpies will easily mix with the black and create a nasty muddy color.
*Also, make sure none of your Sharpies are slightly dry. My blue one was and it was a nightmare to color in with!

4. Very carefully color in the solid black lines, being sure to let sections sit for a few seconds and dry before moving on.

Overall, it was very simple! Here are some pros & cons I found from this project:

Pros: saving money//easy to make//no artistic talent needed

Cons: can't draw over the permanent marker with dry erase marker, or it will erase the whole design

What do you think? I'd love to know-are you going to try it? Let me know in the comments!